how to draw 3d building in photoshop
By Kirk Nelson
Photoshop has never been known for its 3D abilities. It is really better known as Adobe'due south principal-pixel-pusher. The inclusion of 3D objects and Repousse in previous versions marked interesting forays into the realm of raytraced three dimensions. Only the cumbersome workflow and less than stellar results turned abroad many who would otherwise welcome the new tools into their product workflow. In Photoshop CS6, Adobe has taken neat pains to overcome that perception. New features, enhanced workflow, and smoother, more reliable operation all come together to make the 3D features of CS6 extended something worth paying for.
Gone is the term "Repousse" and good riddance! Information technology has been replaced with the much more sensible term, "3D extrusion." That'southward a term that fifty-fifty nosotros can effigy out what it means! Adobe has likewise created an innovative new approach to modifying the properties of the 3D elements. While using the 3D tools, objects have their ain modifier displays, such equally transformation cages and bevel adjustments that tin be accessed right on the canvas. Even the smoothness of shadows can exist adapted past dragging on the shadow! The former slider bars are all the same there, simply it is entirely possible to create, move, edit and adjust 3D objects without e'er having to visit the panels.
This tutorial will demonstrate some of the new 3D features and workflows available in CS6. For the project, we took some inspiration from the Inception movie posters and decided to spell the word Bicubic in large alphabetic character shaped buildings within a urban center. (Because the bicubic smoother interpolation is used for enlarging images in Photoshop!) Fair warning, this tutorial does contain some rather advanced compositing steps that are aimed at the more experienced user, merely those are not the focus of the project. The primary point is to explore the 3D features and workflow, so most of the instruction is spent on those steps.
Bicubic Tutorial Steps
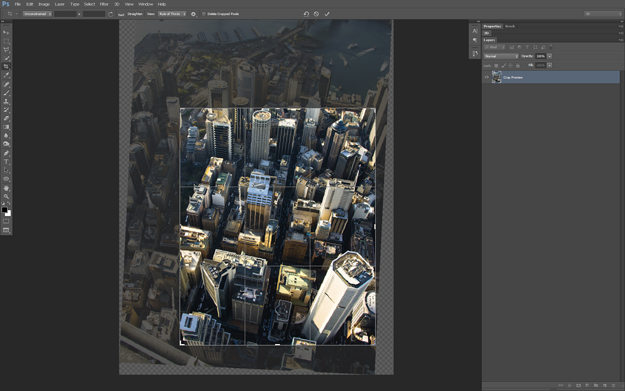
Step ane – Stock Image Selection
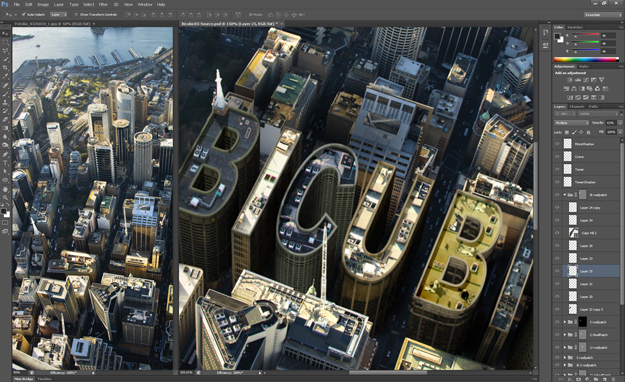
The success of the entire effect rests on the quality of the base image. The shot needs to exist drastically vertical and then the roofs and building shapes are conspicuously visible. A lower, more oblique angle and the letters volition not exist recognizable. The shot you come across here is from fotolia.com (#826018). And then use the new crop tool in CS6 to trim information technology downwardly to the working expanse shown hither.
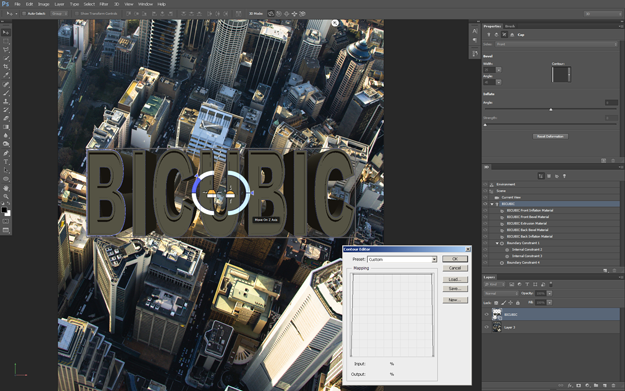
Footstep 2- Bicubic Buildings
Add in the text using a simple no-serif font, Arial works squeamish in this case. Then with the blazon tool however active check the Options bar for a new 3D Extrude icon. Press it and Photoshop switches to the 3D workspace and extrudes the type. Select the Bevel from the Shape presets and set the Extrusion Depth to i.25.

Step three – Build a Ledge
At the bottom of the workspace, you tin switch from 1 layout to the other, using iii tiny icons which correspond the Mobile size, Tablet size, and Desktop size designs. When y'all change from one layout to some other, the respective CSS is practical to the document displayed in Dreamweaver'south workspace. Recollect, you're only working on one HTML file, but because Dreamweaver creates 3 sets of styles, yous can rearrange and resize the elements to create three dissimilar layouts.
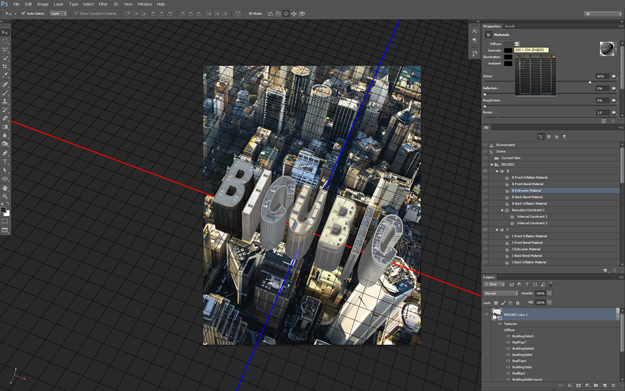
Pace 4 – Plow Entire Buildings on End
With the Bicubic 3D text nonetheless targeted press the 4th icon in the properties panel for Coordinates. Enter xc into the X rotation field to turn the letters up on their end. And so go to the 3D bill of fare and choose Snap Object to Ground Plane.
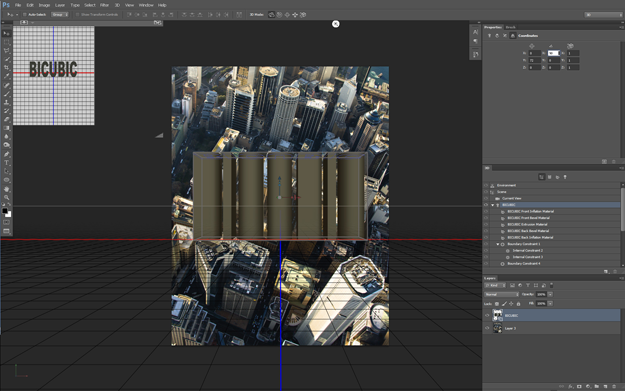
Footstep 5 – A Different Perspective
Click on the Current View line in the 3D panel and make sure the Move Tool is active. Photoshop immediately activates the 3D camera tools. Use these to rotate, pan, and zoom effectually the scene until the buildings fit into the proper perspective.

Step 6 – Break up the Block
Currently the entire word is considered one single mesh to Photoshop. In lodge to assign different textures and properties to the individual buildings, they must each exist a unique 3D element. To do this go to 3D>Split Extrusion. Notice in the 3D panel that Photoshop creates a divide 3D object for each letter.

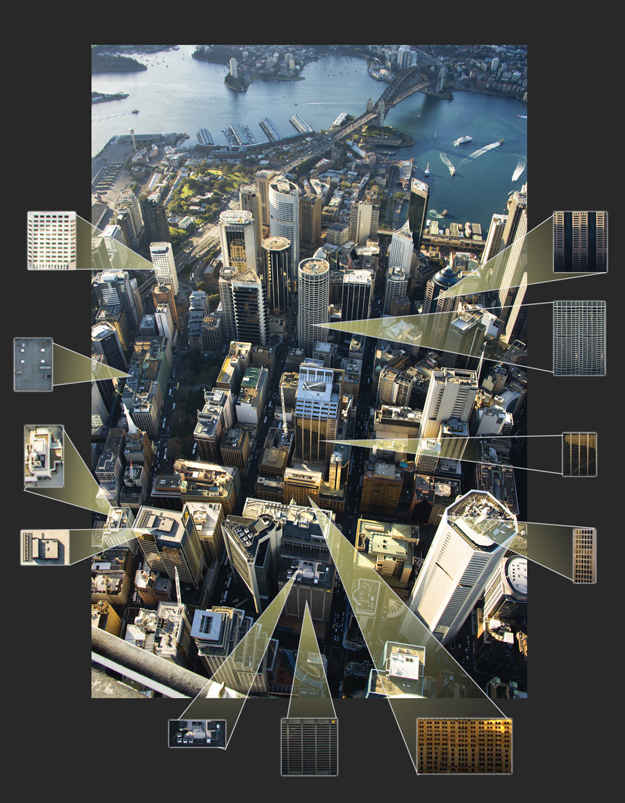
Footstep 7 – Create Textures
Now it's fourth dimension to turn some attention to the texture maps. Open up the original stock image again and find a clear, unobstructed view of a building side. Create a selection of that side and re-create it to a new document. And then utilise the new Perspective Crop tool (found behind the regular Ingather Tool) click on each corner of the map and the tool will remove the perspective and square off the texture. Continue with this process until you accept plenty side and roof textures for each building.
Footstep eight – Bones Texture Mapping
Back in the project file, open the 3D object layers in the 3D panel until yous can see the Material entries. Select the "B Front end Inflation Material" and in the Properties Panel click on the certificate icon next to the Diffuse attribute. Load one of the roof materials to map hither. Employ the same method to map a side texture to the Extrusion material. For the Bevel textile, click on the colour chip to assign a color that can be sampled from the bordering textured surface. Continue on until all the letters are fully mapped.
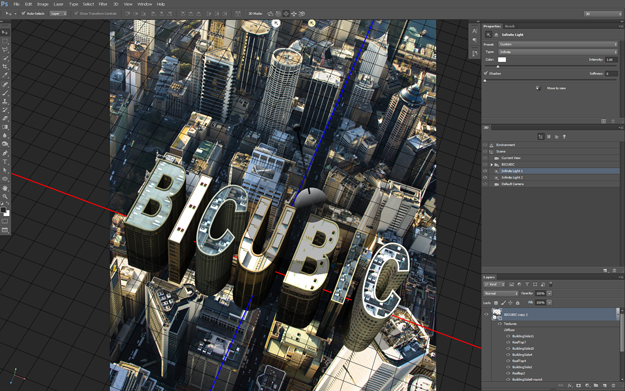
Step 9 – Move the Lord's day
Select the "Infinite Light 1 item" in the 3D panel and use the on-canvas editor to arrange the light management to friction match the base city paradigm, then the light is coming from the top left. Use the Add Light icon (in the base of operations of the 3D console) to create another space calorie-free to serve equally a fill light. Reduce the intensity of this calorie-free and align it to light up the shadow areas and then they are not fully black.
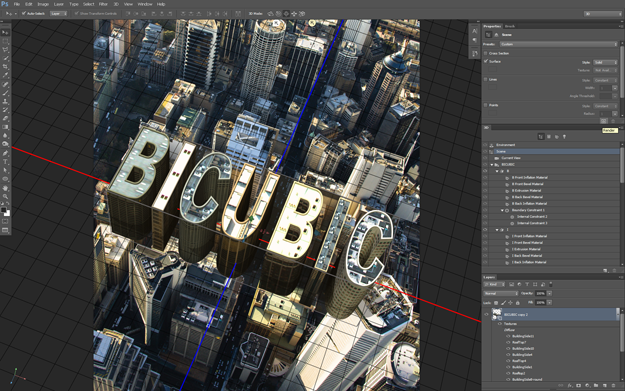
Step 10 – There'south a Return Button!
Press the Render button (no more quality drop down menu to start a render!) in the base of the Backdrop panel and expect as Photoshop renders out the paradigm. Depending on your system strength this might take a while. Notice that CS6 fifty-fifty has a Fourth dimension Remaining status bar in the lower left corner.
Step eleven – Let's Start Compositing
At this bespeak you can Rasterize the 3D layer (Layer>Rasterize>3D) to make information technology available for filters and painting tools that will assistance in the compositing procedure. Next, utilize the Pen Tool to trace around the foreground buildings. Make the full path go up and around the rendered buildings and use the path equally a vector mask on the 3D buildings. The new letters should constrict nicely in behind the foreground buildings.

Stride 12 – Shuffle Buildings Around
The background image needs some adjustments so the render fits seamlessly into it. Duplicate the layer and piece of work on the copy. Create a selection effectually the tall white building in the lower right. Use the New Content Aware Move tool to shorten the building so it doesn't obscure the new buildings. Otherwise, Clone Stamping and Content Aware Fill are the primary tools for this footstep to remove or relocate buildings that are in the mode of the new letter of the alphabet buildings. False shadows tin be created past creating a feathered selection and using the burn tool.
Footstep xiii – Lighting Aligning
Information technology's unlikely the rendered lighting will exactly friction match the background image, and so employ a Curves adjustment layer to right any discrepancies. Clip the adjustment layer to the rendered layer past pressing the outset icon at the base of operations of the Properties panel. Prune a Shadow layer on top of this (by property down the alt/opt key while clicking betwixt the layers) and use a black to transparent linear gradient to add shadows to the base of the buildings.

Stride xiv – Collect the Roof Ataxia
While the rendered textures for the roofs are impressive, they don't quite wait photo realistic. Create a new Roof Patch group for each edifice to offset copying additional architectural elements from elsewhere in the image. Open up the original stock photo and use information technology every bit the source for the Clone Stamp Tool to clone elements into the project file. There are plenty of cranes, Ac units and vents available to choose from!
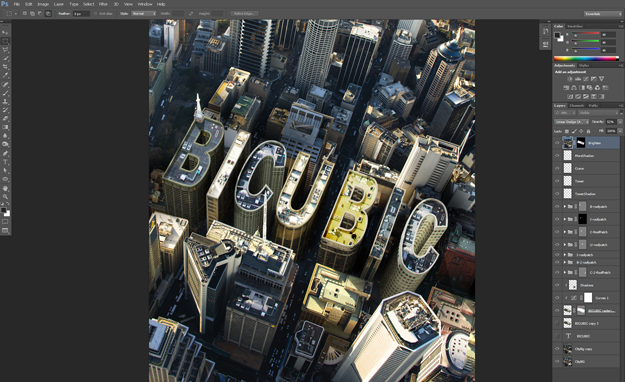
Step 15 – Highlight Blowout
The original photo is a little overexposed. To friction match that condition create a merged layer at the top of the layer stack by holding down the alt/opt key and going to Layer>Merge Visible. Then ctrl/cmd click the rendered layer'south thumbnail to load that shape as a selection. Hold downward alt+ctrl+shift (opt+cmd+shift) and click the mask thumbnail to intersect this with the mask shape. Apply the resulting option equally a mask on the merged layer. Set the blending mode to linear contrivance and reduce the opacity to effectually 50%.
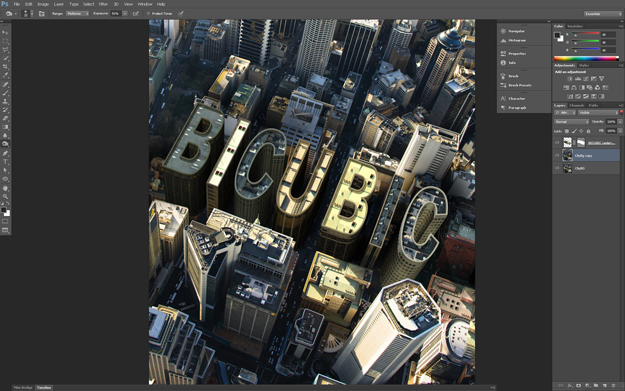
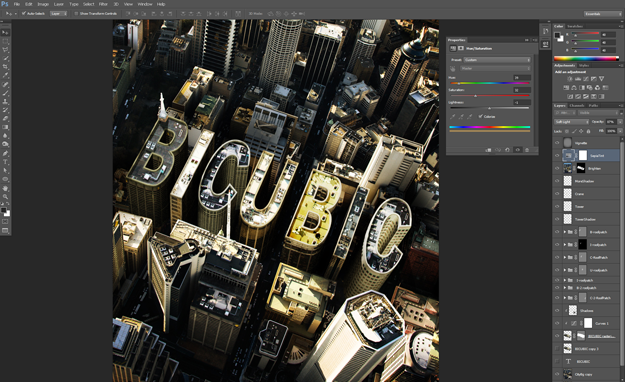
Step xvi – Terminal Effects
Add together a Hue/Saturation adjustment layer to the top of the stack. Cheque the colorize box and adjust the sliders to get a sepia hue (39, 32, -1 works well). Add a Vignette layer on elevation and fill it with 50% grey through the Edit>Fill up command. Run the Lens Correction filter and expect in the custom tab for the slider to add a dark vignette. Finally set the blend mode to Overlay to make the grey invisible.
Recall, the key to creating responsive designs is to position the aforementioned divs for all-time display in each of the iii layouts. For example, in the mobile version, the best practice is to create a single-cavalcade layout, but in the tablet and desktop versions, you lot may want to position the aforementioned divs to create 2 or more columns.
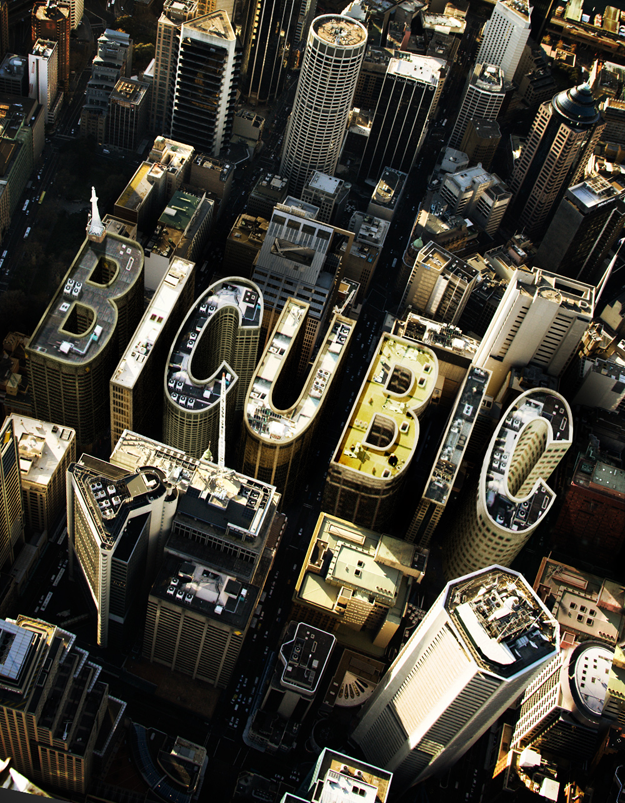
Here is the Terminal Paradigm.
Other Helpful Tips
Get some Assist from Vanishing Point
Information technology tin can be somewhat challenging to get the 3D basis airplane to match the photograph perspective. Here'south a tip that can help. First create a new layer and go to the Vanishing Point filter. Depict out a grid that matches the ground of the photo. In the options flyout menu, select Render Grids to Photoshop. Then press OK and you will have a grid to assist visually align your 3D Basis Airplane!
Render selection
It's likely that the initial setup of textures and lighting isn't exactly what you want. Chances are you will need to render a few times to tweak settings to get everything just right. Don't waste time rendering the unabridged scene time and time again. Create a option of the expanse you lot are working on before pressing the render button. Photoshop renders only the selected pixels. This tin exist a huge time saver!
Secondary 3D view
CS6 includes several new interface elements when working with 3D. I of the most helpful is a secondary view of the 3D object. Become to View>Show>3d Secondary View to become the floating window showing the 3D object from some other perspective. This can exist extremely useful when positioning objects and lights.
Creating Texture Maps
Texture mapping is an art unto itself! The basic idea here is to copy a portion of the photo and use it as a wrapper on the 3D element. To brand sure the texture maps are seamless, employ the Offset filter (Filter>Other>Offset) to wrap the texture effectually the sail sides so y'all can encounter how the edges join together.
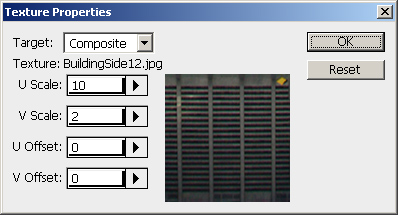
Editing UV properties
If a texture appear stretched or squashed when applied to the building sides, the UV properties need to be adapted. Oftentimes a texture needs to be repeated many times as it wraps all the manner around the building. Click on the same icon used to load the texture map and select Edit UV Properties. This brings up the Texture Properties. Adjust the scale and starting time values needed.
Clone from a Different Document
Did you know the clone tool can source from one document and paint in another? While creating the architectural elements for the roof "clutter" in this projection, open the source stock image next with the project file. With the Clone Stamp tool alt/opt click in the stock image then go to the project file to pigment. Photoshop clones pixels from one certificate to another!
Decision
This is really just the tip of the iceberg when information technology comes to the potential of the new 3D features in Photoshop CS6. The very same technique used here to map a texture to a diffuse color of an object tin be used to control many other properties of the 3D objects. Specular maps can be used to brand certain areas appear shiny while others are matte. Opacity maps command the visibility of a surface; these can be utilized to create invisible areas or holes in a surface that would not exist possible to create otherwise. Mapping a grunge texture to the Roughness property tin can go a long way to breaking up the perfect computer generated appearance of a rendered surface. The list goes on and on.
The possibilities don't end with the texture mapping either. The extrusion options are not limited to a directly extrude with a beveled edge. The twist and bend extrusions make information technology possible to create springs or twisted shapes. The revolve extrusion allows for like shooting fish in a barrel cosmos of rounded objects like glasses or bottles. Additionally, Photoshop tin can import several popular 3d files from other packages to work with too. The back up of improved reflections and refractions, Image Based Lighting, as well as in-camera depth of field makes it possible to create photorealistic renders in Photoshop, it'south easier than we ever imagined.
Most 3D artists will tell you lot that 90% of their rendered piece of work ends upwards in Photoshop anyhow. When fourth dimension is money and you are on a borderline, it is much easier and faster to clone out a stray polygon or make lighting corrections with curves than it is to tweak a setting and re-render an entire scene once again. And then existence able to create or edit 3D work in the same program used to retouch it means fewer render trips between applications and less digging through folders to detect the correct rendered file. This streamlines and consolidates the production pipeline.
Photoshop's 3D features are at present worthy of being noticed. If you've never tried them before, at present is the time. With CS6, these tools have leveled upwards!
Virtually the Author
Kirk Nelson. Kirk is an Adobe Certified Skilful, Freelance Author, Trainer, Speaker, Friendly Neighborhood Graphics Geek.
CS6 Superguide
All the CS6 information and more is available as a PDF magazine called the CS6 Superguide. If y'all're on our list, you lot will receive information technology free by email as shortly as it's available. If non, sign up now and become the CS6 Superguide for gratuitous.
Get in-the-know!
CS6 Superguide
Join our list to receive more than tutorials and tips on Photoshop. Get exclusive tutorials, discounts and the gratis super guides. No spam, all content, no more than once a week.
If you're on our list, you volition receive information technology costless by e-mail as presently as it'due south available. If not, sign up at present and get the CS6 Superguide for free. Or click the image below.
Source: https://photoshopcafe.com/cs6/Photoshop3D-CS6-KN.html
Postar um comentário for "how to draw 3d building in photoshop"